React Native Form Management Tutorial - Building a credit card form
A guide about creating declarative forms in React Native using react-hook-form by building credit card form example.
Last Update: January 18, 2021
18 min read • ––– views
Forms are pretty common in all kinds of apps. That's why developers are often trying to simplify the process of building forms. I've built some custom solutions before, also used all the popular form management libraries so far. I think react-hook-form is the best one in terms of developer experience and customization.
It's pretty straightforward to use it on the web. You simply create your HTML input elements and register them. But it's a little harder with React Native. So I'll try describing each step I took to be able to make my approach more clear. I'll be building a credit card form in this tutorial but the tutorial should be helpful with building any types of forms. Most of the components we'll be building here can be reused as well.
You may find the full version of this component on Github. I also ported the React Native code into the web thanks to react-native-web.
Play with it here 👇
Table of Contents
- Starting with a simple UI
- Integrating react-hook-form
- Validations
- Formatting input values
- Focusing on the next field
- Displaying the card type icon
- Testing
- Output
Starting with a simple UI
For this tutorial, I used this clean design I found on Dribbble as the design reference. I've also used the TextField component I built in my last post. Here is the CreditCardForm component that generates the UI with simple local state variables:
import React, { useState } from 'react';import { StyleSheet, View } from 'react-native';import Button from './Button';import TextField from './TextField';const CreditCardForm: React.FC = () => {const [name, setName] = useState('');const [cardNumber, setCardNumber] = useState('');const [expiration, setExpiration] = useState('');const [cvv, setCvv] = useState('');function onSubmit() {console.log('form submitted');}return (<View><TextFieldstyle={styles.textField}label="Cardholder Name"value={name}onChangeText={(text) => setName(text)}/><TextFieldstyle={styles.textField}label="Card Number"value={cardNumber}onChangeText={(text) => setCardNumber(text)}/><View style={styles.row}><TextFieldstyle={[styles.textField,{marginRight: 24,},]}label="Expiration Date"value={expiration}onChangeText={(text) => setExpiration(text)}/><TextFieldstyle={styles.textField}label="Security Code"value={cvv}onChangeText={(text) => setCvv(text)}/></View><Button title="PAY $15.12" onPress={onSubmit} /></View>);};const styles = StyleSheet.create({row: {flex: 1,flexDirection: 'row',marginBottom: 36,},textField: {flex: 1,marginTop: 24,},});export default CreditCardForm;
I'm simply including the form in a ScrollView on the App component:
import React, { useState } from 'react';import { StyleSheet, Text, ScrollView } from 'react-native';import CreditCardForm from './components/CreditCardForm';const App: React.FC = () => {return (<ScrollView contentContainerStyle={styles.content}><Text style={styles.title}>Payment details</Text><CreditCardForm /></ScrollView>);};const styles = StyleSheet.create({content: {paddingTop: 96,paddingHorizontal: 36,},title: {fontFamily: 'Avenir-Heavy',color: 'black',fontSize: 32,marginBottom: 32,},});export default App;
Integrating react-hook-form
Using react-hook-form provides subtle benefits over building form logics manually. The most obvious advantages are building more readable code, easier maintenance, and more reusability.
So let's start by adding react-hook-form to our project:
npm install react-hook-form// oryarn add react-hook-form
You may use any TextInput component you have inside react-hook-form. It has a special Controller component that helps to register the input to the library.
This is the minimum code block needed to build a React Native form with react-hook-form:
import React from 'react';import { View, Text, TextInput } from 'react-native';import { useForm, Controller } from 'react-hook-form';export default function App() {const { control, handleSubmit, errors } = useForm();const onSubmit = (data) => console.log(data);return (<View><Controllercontrol={control}render={({ onChange, onBlur, value }) => (<TextInputstyle={styles.input}onBlur={onBlur}onChangeText={(value) => onChange(value)}value={value}/>)}name="firstName"rules={{ required: true }}defaultValue=""/>{errors.firstName && <Text>This is required.</Text>}</View>);}
While this is good enough for a single input, it's a better idea to create a generic wrapper input component that handles repetitive work such as using the Controller and displaying the error message. For that purpose, I'm going to create FormTextField. It will need to access some of the properties that are returned from the useForm method. We may pass those values as a prop from CreditCardForm to FormTextField but that'd mean repeating the same prop for each input. Fortunately, react-hook-form provides the useFormContext method which lets you access all the form properties in deeper component levels.
And FormTextField will look like this:
import React from 'react';import { useFormContext, Controller } from 'react-hook-form';import TextField from './TextField';type Props = React.ComponentProps<typeof TextField> & {name: string;};const FormTextField: React.FC<Props> = (props) => {const { name, ...restOfProps } = props;const { control, errors } = useFormContext();return (<Controllercontrol={control}render={({ onChange, onBlur, value }) => (<TextField// passing everything down to TextField// to be able to support all TextInput props{...restOfProps}errorText={errors[name]?.message}onBlur={onBlur}onChangeText={(value) => onChange(value)}value={value}/>)}name={name}/>);};export default FormTextField;
Now, it's time to migrate our form components to react-hook-form. We'll simply replace TextFields with our new FormTextField component, replace local state variables with a single form model, and wrap our form with FormProvider.
Note that it's very easy to create Typescript types for our form. You'll need to build a FormModel type that contains each field in your form. Notice that the field names should match the ones you're passing into FormTextField. The library will update the right field based on that prop.
After those changes, the new version of CreditCardForm will look like below. You may check out the full diff on Github.
interface FormModel {holderName: string;cardNumber: string;expiration: string;cvv: string;}const CreditCardForm: React.FC = () => {const formMethods = useForm<FormModel>({defaultValues: {holderName: '',cardNumber: '',expiration: '',cvv: '',},});function onSubmit(model: FormModel) {console.log('form submitted', model);}return (<View><FormProvider {...formMethods}><FormTextFieldstyle={styles.textField}name="holderName"label="Cardholder Name"/><FormTextFieldstyle={styles.textField}name="cardNumber"label="Card Number"/><View style={styles.row}><FormTextFieldstyle={[styles.textField,{marginRight: 24,},]}name="expiration"label="Expiration Date"/><FormTextFieldstyle={styles.textField}name="cvv"label="Security Code"keyboardType="number-pad"/></View><Buttontitle="PAY $15.12"onPress={formMethods.handleSubmit(onSubmit)}/></FormProvider></View>);};
Improving reusability
I had to make a decision at this point in terms of the better reusability of the form. It's about where to create our form initially using the useForm method. We have two options:
- Defining the form inside
CreditCardFormas the way it is. This makes sense if you'll use the credit card form in a single flow/screen. You don't have to redefine the form and pass it throughFormProviderin multiple places this way. - Defining the form in
CreditCardForm's parent, which is the component that consumes it. You'll have access to allreact-hook-formmethods this way and you may build independent stuff upon everythingCreditCardFormprovides. Let's say you have two screens: one for paying for a product, and the other is just for registering a credit card. Buttons should look different in those cases.
Here is one example about the second option. In this example, we are watching the card number value changes and updating the button title based on that:
const App: React.FC = () => {const formMethods = useForm<FormModel>({// to trigger the validation on the blur eventmode: 'onBlur',defaultValues: {holderName: 'Halil Bilir',cardNumber: '',expiration: '',cvv: '',},})const cardNumber = formMethods.watch('cardNumber')const cardType = cardValidator.number(cardNumber).card?.niceTypefunction onSubmit(model: FormModel) {Alert.alert('Success')}return (<ScrollView contentContainerStyle={styles.content}><Text style={styles.title}>Payment details</Text><CreditCardForm /><FormProvider {...formMethods}><Text style={styles.title}>Payment details</Text><CreditCardForm /><Buttontitle={cardType ? `PAY $15.12 WITH ${cardType}` : 'PAY $15.12'}onPress={formMethods.handleSubmit(onSubmit)}/></FormProvider></ScrollView>)}
I'll go with the second option.
Validations
react-hook-form lets us defining validations simply by passing rules to the Controller. Let's start by adding that to FormTextField:
import { useFormContext, Controller } from 'react-hook-form'import { useFormContext, Controller, RegisterOptions } from 'react-hook-form'import TextField from './TextField'type Props = React.ComponentProps<typeof TextField> & {name: stringrules: RegisterOptions}const FormTextField: React.FC<Props> = (props) => {const { name, ...restOfProps } = propsconst { name, rules, ...restOfProps } = propsconst { control, errors } = useFormContext()return (@@ -25,6 +26,7 @@ const FormTextField: React.FC<Props> = (props) => {/>)}name={name}rules={rules}/>)}
For the tutorial, I'll delegate the validations logic to Braintree's card-validator library to keep us focused on the form part. Now I need to define rules for our FormTextField components. rules object will contain two properties:
required: This takes a message that is displayed when the field is empty.validate.{custom_validation_name}: We may create a custom validation method here. I'm going to use it for validating the integrity of the input value usingcard-validationlibrary.
Our input fields will need to look like below. You may check out the full diff of validation rules on Github.
<><FormTextFieldstyle={styles.textField}name="holderName"label="Cardholder Name"rules={{required: 'Cardholder name is required.',validate: {isValid: (value: string) => {return (cardValidator.cardholderName(value).isValid ||'Cardholder name looks invalid.');},},}}/><FormTextFieldstyle={styles.textField}name="cardNumber"label="Card Number"keyboardType="number-pad"rules={{required: 'Card number is required.',validate: {isValid: (value: string) => {return (cardValidator.number(value).isValid ||'This card number looks invalid.');},},}}/><FormTextFieldstyle={[styles.textField,{marginRight: 24,},]}name="expiration"label="Expiration Date"rules={{required: 'Expiration date is required.',validate: {isValid: (value: string) => {return (cardValidator.expirationDate(value).isValid ||'This expiration date looks invalid.');},},}}/><FormTextFieldstyle={styles.textField}name="cvv"label="Security Code"keyboardType="number-pad"maxLength={4}rules={{required: 'Security code is required.',validate: {isValid: (value: string) => {const cardNumber = formMethods.getValues('cardNumber');const { card } = cardValidator.number(cardNumber);const cvvLength = card?.type === 'american-express' ? 4 : 3;return (cardValidator.cvv(value, cvvLength).isValid ||'This security code looks invalid.');},},}}/></>
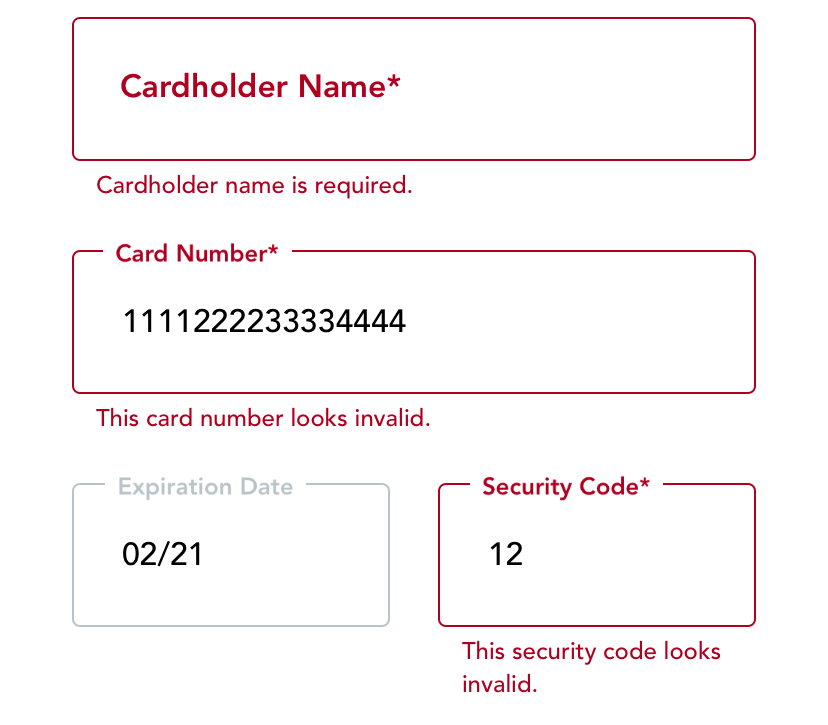
After making those changes, we'll see the following screen when clicking on the PAY button:
Triggering validations
The validation trigger scheme is configurable with react-hook-form without any custom code. mode parameter configures the validation trigger scheme:
onChange: Validation will trigger on the submit event and invalid inputs will attach onChange event listeners to re-validate them.onBlur: Validation will trigger on the blur event.onTouched: Validation will trigger on the first blur event. After that, it will trigger on every change event.
While those modes are enough for most cases, I wanted a custom behavior with my form. I want to provide fast feedback to the user but it shouldn't be too fast as well. This means I want to validate my input right after the user enters enough characters. That's why I created an effect in FormTextField that watches the input value and triggers the validation when it passes a certain threshold(validationLength prop here).
Please note that this is not required for the form to function at all, and it may cost some performance penalty if your validation method is intensive.
type Props = React.ComponentProps<typeof TextField> & {name: stringrules: RegisterOptionsvalidationLength?: number}const FormTextField: React.FC<Props> = (props) => {const { name, rules, ...restOfProps } = propsconst { control, errors } = useFormContext()const {name,rules,validationLength = 1,...restOfProps} = propsconst { control, errors, trigger, watch } = useFormContext()const value = watch(name)useEffect(() => {if (value.length >= validationLength) {trigger(name)}}, [value, name, validationLength, trigger])
Formatting input values
To make the card number and expiration input fields look good, I'll format their values instantly with each new character users enter.
- Credit card number: I'll format its value in
XXXX XXXX XXXX XXXXformat. - Expiration date: I'll format its value in
MM/YYformat.
There are some libraries that do a similar job but I want to create a simple solution on my own. So I created utils/formatters.ts file for this purpose:
export function cardNumberFormatter(oldValue: string,newValue: string,): string {// user is deleting so return without formattingif (oldValue.length > newValue.length) {return newValue;}return newValue.replace(/\W/gi, '').replace(/(.{4})/g, '$1 ').substring(0, 19);}export function expirationDateFormatter(oldValue: string,newValue: string,): string {// user is deleting so return without formattingif (oldValue.length > newValue.length) {return newValue;}return newValue.replace(/\W/gi, '').replace(/(.{2})/g, '$1/').substring(0, 5);}
Now we'll simply create a formatter prop for FormTextField component, and pass the value it returns to onChange:
onChangeText={(value) => onChange(value)}onChangeText={(text) => {const newValue = formatter ? formatter(value, text) : textonChange(newValue)}}value={value}/>)}
I created some tests to make sure format utilities return the expected values using jest's test.each method. I hope it'll make it easier for you to understand what those utils methods are doing:
import { cardNumberFormatter, expirationDateFormatter } from './formatters';describe('cardNumberFormatter', () => {test.each([{// pasting the numberoldValue: '',newValue: '5555555555554444',output: '5555 5555 5555 4444',},{// trims extra charactersoldValue: '',newValue: '55555555555544443333',output: '5555 5555 5555 4444',},{oldValue: '555',newValue: '5555',output: '5555 ',},{// deleting a characteroldValue: '5555 5',newValue: '5555 ',output: '5555 ',},])('%j', ({ oldValue, newValue, output }) => {expect(cardNumberFormatter(oldValue, newValue)).toEqual(output);});});describe('expirationDateFormatter', () => {test.each([{// pasting 1121oldValue: '',newValue: '1121',output: '11/21',},{// pasting 11/21oldValue: '',newValue: '11/21',output: '11/21',},{oldValue: '1',newValue: '12',output: '12/',},{// deleting a characteroldValue: '12/2',newValue: '12/',output: '12/',},])('%j', ({ oldValue, newValue, output }) => {expect(expirationDateFormatter(oldValue, newValue)).toEqual(output);});});
Focusing on the next field
I believe this is a good UX pattern for forms: focusing on the next input field when the user has filled the current input. There are two possible ways to understand when the user is done:
- Listening to the
onSubmitEditingevent of the input. This is invoked when users click on the return button of the keyboard. - Checking the input validation results: it means the user has entered all the necessary characters for the credit card, expiration, and CVV fields whenever they are valid.
I'll use the first method on the cardholder name input, and the second one on the rest. It's simply because we don't know when the cardholder's name is completed, unlike other ones.
We need to keep refs for each input, and invoke nextTextInputRef.focus method appropriately. We have two custom components that wrap the React Native TextInput: they are FormTextField and TextField. So we have to use React.forwardRef to make sure ref is attached to the native TextInput.
Here are the steps I followed to build this:
- Wrapped
FormTextFieldandTextFieldwithReact.forwardRef:
import { TextInput } from "react-native"// components/FormTextField.tsxconst FormTextField: React.FC<Props> = (props) => {const FormTextField = React.forwardRef<TextInput, Props>((props, ref) => {// components/TextField.tsxconst TextField: React.FC<Props> = (props) => {const TextField = React.forwardRef<TextInput, Props>((props, ref) => {
- Created
onValidprop onFormTextFieldcomponent, and modified the effect that triggers validation:
useEffect(() => {async function validate() {const isValid = await trigger(name)if (isValid) onValid?.()}if (value.length >= validationLength) {trigger(name)validate()}}, [value, name, validationLength, trigger])
- Created a ref for each component and triggered the next input ref's
onFocusmethod:
const holderNameRef = useRef<TextInput>(null)const cardNumberRef = useRef<TextInput>(null)const expirationRef = useRef<TextInput>(null)const cvvRef = useRef<TextInput>(null)<><FormTextFieldref={holderNameRef}name="holderName"label="Cardholder Name"onSubmitEditing={() => cardNumberRef.current?.focus()}/><FormTextFieldref={cardNumberRef}name="cardNumber"label="Card Number"onValid={() => expirationRef.current?.focus()}/><FormTextFieldref={expirationRef}name="expiration"label="Expiration Date"onValid={() => cvvRef.current?.focus()}/><FormTextFieldref={cvvRef}name="cvv"label="Security Code"onValid={() => {// form is completed so hide the keyboardKeyboard.dismiss()}}/></>
You can check out the full diff of this section on Github.
Displaying the card type icon
This is our last feature. I created the CardIcon component for this, and I'll pass it to the input through the endEnhancer prop.
import React from 'react';import { Image, StyleSheet } from 'react-native';import cardValidator from 'card-validator';const VISA = require('./visa.png');const MASTERCARD = require('./mastercard.png');const AMEX = require('./amex.png');const DISCOVER = require('./discover.png');type Props = {cardNumber: string;};const CardIcon: React.FC<Props> = (props) => {const { cardNumber } = props;const { card } = cardValidator.number(cardNumber);let source;switch (card?.type) {case 'visa':source = VISA;break;case 'mastercard':source = MASTERCARD;break;case 'discover':source = DISCOVER;break;case 'american-express':source = AMEX;break;default:break;}if (!source) return null;return <Image style={styles.image} source={source} />;};const styles = StyleSheet.create({image: {width: 48,height: 48,},});export default CardIcon;
You can review the full diff for the card icon over here.
Testing
I will create some tests for the critical parts of the form to make sure we'll know instantly when they are breaking, which are validations, value formattings, and form submission.
I love using react-native-testing-library for my tests. It lets you create tests similar to user behavior.
I'm also using bdd-lazy-var, the tool I learned about in my last job. I still pick it up on my tests as it helps to describe the test variables in a clean and more readable way.
So I'll set up a form with useForm and pass it through the FormProvider just like using it on an actual screen. I'll then change input values, test validation results, and check the result react-hook-form returns when I submit the button. Here is the base setup I'll use in all of my test cases:
import React from 'react';import { fireEvent, render, waitFor } from '@testing-library/react-native';import { def, get } from 'bdd-lazy-var/getter';import { useForm, FormProvider } from 'react-hook-form';import { Button } from 'react-native';import CreditCardForm from './CreditCardForm';const FormWrapper = () => {const formMethods = useForm({mode: 'onBlur',defaultValues: {holderName: '',cardNumber: '',expiration: '',cvv: '',},});const { handleSubmit } = formMethods;const onSubmit = (model) => {get.onSubmit(model);};return (<FormProvider {...formMethods}><CreditCardForm /><Button onPress={handleSubmit(onSubmit)} title={'Submit'} /></FormProvider>);};def('render', () => () => render(<FormWrapper />));def('onSubmit', () => jest.fn());
Testing credit card number validation
I have three assertions in this test case:
- The validation is not triggered before I type in 16 characters.
- An error is displayed when I enter an invalid credit card number.
- The error disappears when I enter a valid card number.
it('validates credit card number', async () => {const { queryByText, getByTestId } = get.render();// does not display validation message until input is filledconst cardInput = getByTestId('TextField.cardNumber');fireEvent.changeText(cardInput, '55555555');await waitFor(() => {expect(queryByText(/This card number looks invalid./)).toBeNull();});// invalid cardfireEvent.changeText(cardInput, '5555555555554440');await waitFor(() => {expect(queryByText(/This card number looks invalid./)).not.toBeNull();});// valid cardfireEvent.changeText(cardInput, '5555 5555 5555 4444');await waitFor(() => {expect(queryByText(/This card number looks invalid./)).toBeNull();});});
Testing expiration date validation
Testing with passed and valid dates, and checking the validation error is displayed/hidden:
it('validates expiration date', async () => {const { queryByText, getByTestId } = get.render();const input = getByTestId('TextField.expiration');// passed expiration datefireEvent.changeText(input, '1018');await waitFor(() =>expect(queryByText(/This expiration date looks invalid./)).not.toBeNull(),);// valid datefireEvent.changeText(input, '10/23');await waitFor(() =>expect(queryByText(/This expiration date looks invalid./)).toBeNull(),);});
Testing the form submission
Entering correct values to each input and clicking on the submit button. I then expect the onSubmit method is called with the correct and formatted data:
it('submits the form', async () => {const { getByText, getByTestId } = get.render();fireEvent.changeText(getByTestId('TextField.holderName'), 'Halil Bilir');fireEvent.changeText(getByTestId('TextField.cardNumber'), '5555555555554444');fireEvent.changeText(getByTestId('TextField.expiration'), '0224');fireEvent.changeText(getByTestId('TextField.cvv'), '333');fireEvent.press(getByText('Submit'));await waitFor(() =>expect(get.onSubmit).toHaveBeenLastCalledWith({holderName: 'Halil Bilir',// cardNumber and expiration are now formattedcardNumber: '5555 5555 5555 4444',expiration: '02/24',cvv: '333',}),);});
Output
Here is a screencast of what we've build so far:
You can find the full version on Github. Please feel free to send me a message over Twitter if you have any feedback or questions.